Hello World KitchenBeta
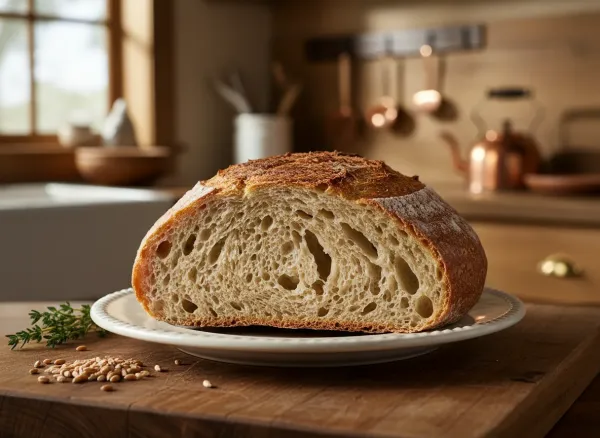
A crusty, artisan-style bread made with just four simple ingredients. This beginner-friendly recipe relies on a long, slow overnight fermentation to develop flavor and a pre-heated Dutch oven to create a bakery-worthy, crackly crust without any kneading required.

Ingredients
Main
- 3 cups Bread flour — Plus extra for dusting. All-purpose flour can be substituted, but bread flour yields a better chew.
- 1.5 cups Warm water — Between 95°F and 105°F
- 1.5 teaspoons Kosher salt — If using table salt, reduce to 1 teaspoon
- 0.5 teaspoons Instant yeast — Active dry yeast works too, but instant is foolproof
Instructions
-
In a large mixing bowl, whisk together the flour, kosher salt, and instant yeast.
~2 minMake sure your bowl is quite large, as the dough will double or triple in size. -
Pour the warm water into the bowl. Using a wooden spoon or your hands, mix until a very wet, sticky, and shaggy dough forms. There should be no dry pockets of flour remaining.
~3 minDo not overmix; just bring it together until incorporated. -
Cover the bowl tightly with plastic wrap or a damp kitchen towel. Let it sit at room temperature for 12 to 18 hours.
~14hThe longer it sits, the more flavor it develops. The dough is ready when the surface is dotted with bubbles and has more than doubled in size. -
Place your empty Dutch oven (with the lid on) into the oven. Preheat the oven to 450°F (230°C). Allow the pot to heat up for at least 30 minutes.
~30 minPreheating the Dutch oven is crucial. It creates the burst of steam needed for a bakery-style crust. -
While the oven preheats, turn the dough out onto a heavily floured sheet of parchment paper. The dough will be very loose and sticky. With floured hands or a bench scraper, fold the edges of the dough in toward the center to form a rough, round loaf. Flip it seam-side down on the parchment.
~5 minIf the dough is too sticky to handle, wet your hands with cold water or generously flour them. Don't worry about making it perfectly smooth. -
Cover the shaped dough loosely with a towel while the Dutch oven finishes preheating.
This gives the gluten a brief rest before baking. -
Carefully remove the blazing hot Dutch oven from the oven. Using the corners of the parchment paper as a sling, lift the dough and lower it into the Dutch oven. Put the lid back on.
~1 minBe extremely careful as the pot is dangerously hot. -
Bake covered for 30 minutes. The trapped steam will help the bread rise (oven spring) and develop a thick crust.
~30 minDo not peek during this phase; you need to trap all the steam! -
Remove the lid and bake for another 10-15 minutes, or until the crust is deep golden brown.
~15 minFor an even crispier crust, aim for a dark mahogany color. -
Carefully remove the bread from the Dutch oven and transfer it to a wire cooling rack. Let it cool completely (at least 1-2 hours) before slicing.
~2hCutting into hot bread will result in a gummy, dense texture. Patience is key!
Nutrition
Equipment
- Large mixing bowl
- Wooden spoon or Danish dough whisk
- Plastic wrap or damp towel
- 5 to 6-quart Dutch oven with an oven-safe lid
- Parchment paper
- Bench scraper (optional)
Tips & Storage
- High hydration doughs are notoriously sticky. Resist the urge to add too much extra flour during shaping; the moisture is what creates the beautiful holes (crumb) inside.
- If your kitchen is very cold, place the dough in the oven (turned off) with just the oven light on for a slightly warmer environment.
- Score the top of the dough with a sharp knife or razor right before baking if you want to control where the bread expands.
- Storage: Store leftover bread cut-side down on a cutting board at room temperature for up to 2 days, or keep loosely wrapped in a paper bag. To freeze, slice the bread completely, place in a zip-top freezer bag, and freeze for up to 3 months. Toast slices directly from frozen.
Tags
🤖 This recipe was created with AI assistance. If you spot a mistake or something that doesn't look right, please report it.